Tuesday, April 22, 2014

Designing Your Kitchen Pantry

As we conclude our look at designing the ultimate kitchen, down to every detail, we certainly can’t leave out that element you’ll find yourself using several times a day: the pantry.

Pantry Styles
There are lot of factors that go into the design of this ultimate dinner-prep storage space, not the least of which is where it should be located. Now, if you’re doing a remodel, then the options here are somewhat limited. You may be able to redo a closet space that already exists, or turn pre-existing cabinets into a more functional pantry space. You could also put in an additional wardrobe sized cabinet built to suit your pantry needs.

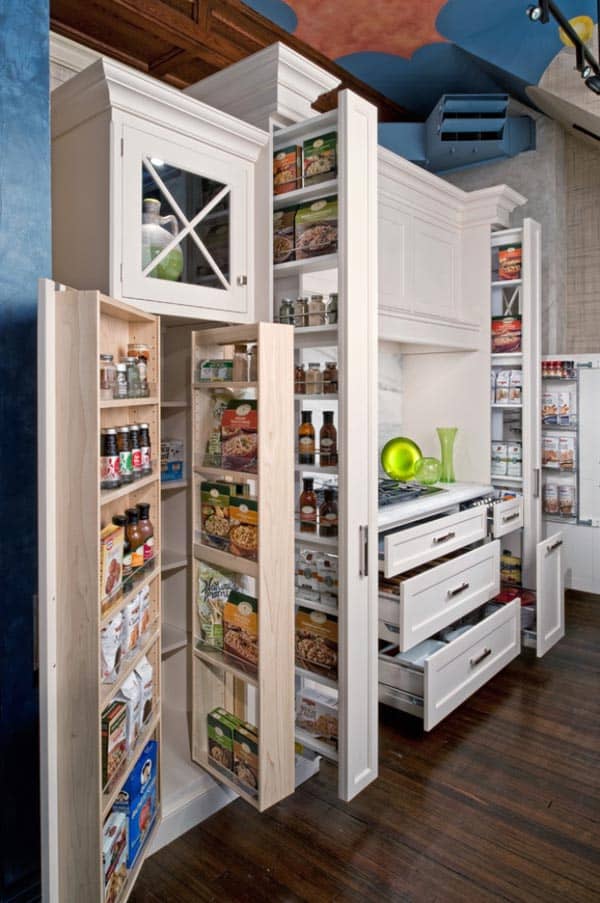
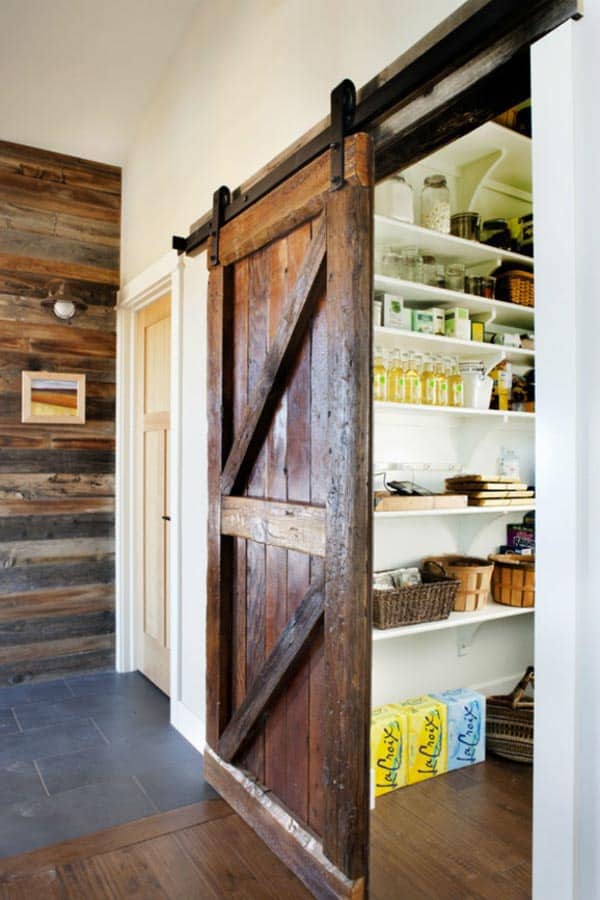
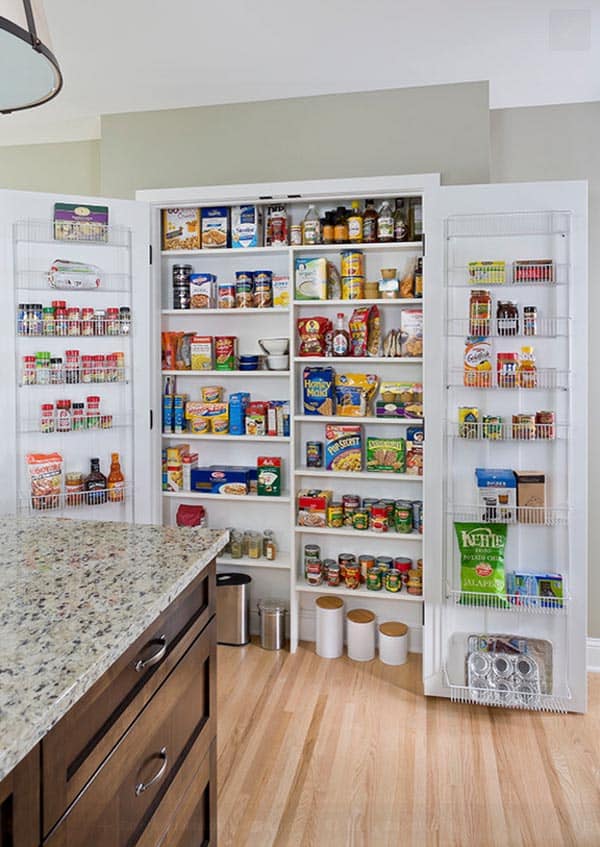
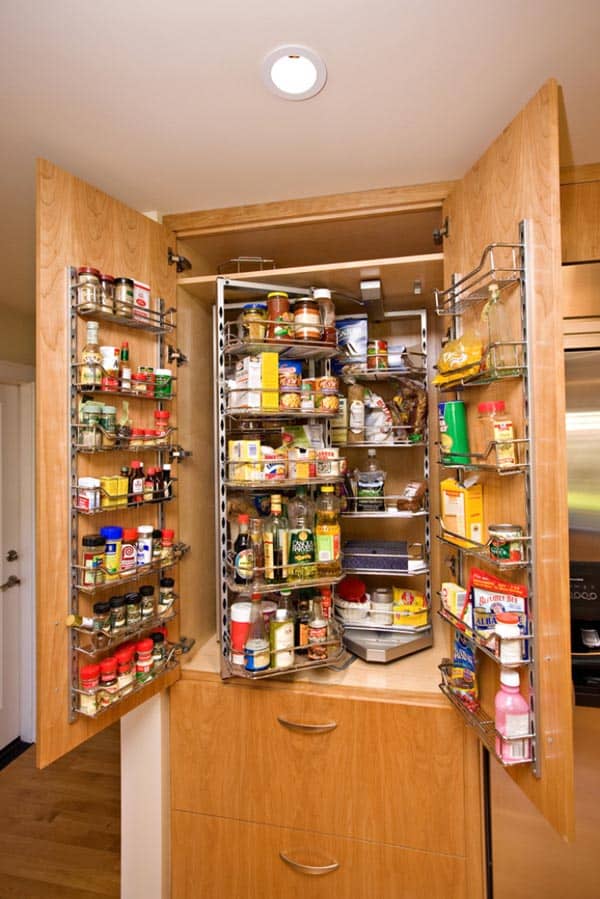
Basically, it comes down to three designs: reach-in, pull-out or walk-in. Reach-in pantries are the most common, often used in a small closet or built in cabinets spaces. The pull-out option isn’t always convenient, but works great when space is limited. And, of course, walk-in pantries are every cook’s storage dream.

If you’re building a kitchen from scratch, or doing a full scale, gut-all-the-way-down-to-the-studs remodel, you have a lot more options on space and style. Consider the following types of pantries to fit your storage needs:

Check out these images of awesome pantry ideas for more brainstorming options on your own space.

The Essential Storage Rules
Regardless of the type of pantry you want and the amount of storage you have, you should keep these “golden rules of storage” in mind as you plan:
  • The Food Prep Zone – Your pantry, whatever the size or shape, should be located as close to the food prep and/or cooking zones as possible, in order to make your cooking time function efficiently
  • Determine What You’re Storing – Before designing your pantry, figure out exactly what you’ll be storing there and plan the height and depth of shelves and drawers based upon what you’ll have in the pantry (whether it’s canned goods, extra appliances or cookbooks)
  • Avoid Layers – Design the pantry so that items can be stored in a single layer, with nothing behind or beneath. The goal is being able to see everything at a glance, so you can find what you need and inventory is done quickly
  • Store Front to Back – Put the things you use the most in the front of the pantry, and the things you use less often toward the back, or at the furthest point from the opening, that way you’re not having to constantly dig for what you need.

Don’t Forget
There are a couple of things you may not think of when it comes to your pantry design, but will later wish you had. Consider locating the pantry near a landing zone – countertop space next to (or inside a walk-in pantry) where you can put bags of groceries as you unload them into the pantry or where you can put several items as you take them out of the pantry for food prep.


Also, discuss with HA Construction the best lighting options for the style of pantry you’ll be utilizing, whether it’s a reach-in or a walk-in. Walk-ins, of course, typically have their own light switch for overhead lighting, but you might also want to consider under cabinet lighting for the shelves. That may also come in handy for a reach-in or pull-out option, depending on the design.

Tuesday, April 15, 2014

Double Wall Oven Hype

Kelly Ripa has a double wall oven. You see it in several of her Eletrolux commericals, such as the one for the fridge, and she’s done several demos of the style for the brand. Okay, so we don’t know for sure that she has one, but we’re certainly led to believe that she does. And that she needs them to keep up with all of the people she has over.

They question is, do you need a double wall oven? In the midst of that build or kitchen remodel, this is certainly something to consider. Sure, they’re great in theory – wonderful for when you’re cooking a Thanksgiving dinner for the masses – but are they worth the investment in the long haul?

They May Come in Handy
When you look over forums online which question the worth of a double wall oven, most folks rave about them. There seems to be a no-turning-back mentality from those that use them. As mentioned, they are perfect for cooking for large groups.

Having double wall ovens also provides the option to cook fish and cookies at the same time, without transference of flavor. And for those ladies (or gentlemen) that enjoy baking and do so regularly, it’s like winning the lottery. Additionally, the upper wall oven (and the bottom, depending on installation) eliminates the need for bending over to utilize it.

Things to Consider
Because of the unique installation requirements for wall ovens, you really can go from a regular range/oven combo to a wall unit unless you’re building or doing a full-scale kitchen remodel. Or, of course, replacing a pre-existing wall oven.

Wall ovens are available in widths from 24 to 36 inches, most of which are smaller than traditional range ovens. Many double wall oven combos have a smaller unit on top, and if you fail to determine the exact measurements you need, you may end up with a wall oven that a typical full-sized cookie sheet won’t fit in (a common complaint among forums).

Also consider that many double wall ovens have a convection oven on the top and a standard oven on bottom. Standard, conventional ovens surround the food with hot air, while convection ovens circulate the hot air with the use of a fan, which is said to cook more evenly. What you go for just depends on what you’re used to cooking with.

As far as cost goes, wall ovens are usually only a couple of hundred dollars more than range ovens – but double wall ovens mean you’ll be paying for two, so consider that in your budget. You likely won’t have to worry about gas vs. electric, as most wall ovens are only available in electric. Those that are gas are the smaller models at 24 inches and may cost more.

What it all Broils Down To
When considering whether to install a double wall oven or keep it singular, it really just comes down to your budget, available space and how much you’ll use both ovens. If you’re an avid baker and often cook for a large family, then it may be worth it to have the double wall ovens installed. HA Construction can help you determine what will work best for your budget and available space. 

Wednesday, April 9, 2014

Kitchen Décor | Back Splash Tile

We’ve had a few posts now on kitchen design elements that can work together to create a versatile and stylish cooking and entertaining space. Another one of those elements – one that really allows you to make a statement – is the back splash.

But not just any old rimmed countertop back splash. We’re talking fully decking out the walls between the top of your counters and the bottom of your cabinets with beautiful, eye-catching tiles.

And the design possibilities are seemingly endless.

Wowing Through Tile
According to Andy here at HA Construction, a tile back splash is the crown of the kitchen – the cherry on top, if you will. Not only does a tile backsplash make for an easily cleanable service, but it provides opportunity for aesthetic appeal. While your countertops and cabinets are generally a neutral tone, the tile back splash can be that pop of color and creative whimsy that really pulls everything together.

From a builder standpoint, the tile is mounted directly to the sheetrock between the back of your countertops and the bottom of your upper wall cabinets. Square tiles can be anywhere from one inch to the common four inch option.  You can choose tiles all the same color, some with hand-painted designs,  or a mix and match colors and designs to create something unique.

Types of Backsplash Tile
Don’t limit yourself to simple square options, especially if you want to let out your creative side. Other backsplash tiles include:
  • Subway Tiles – usually something like 3x6 inches
  • Glass Tiles – provide a reflective surface for another dimension t the design
  • Mosaic Tiles –often come in one foot squares of several tiles put together on a mesh backing to save time
  • Laser Cut Tiles – cut in beautiful shapes to create elaborate designs when pieced together on the wall
  • Diagonal Design – turn ordinary square tile on the diagonal to take it up a notch
  • Wallpaper Style – some companies can customize overscale patterns to repeat, producing a wallpaper effect through tile
  • Herringbone Tile – also available on a mesh 12x12 backing, herringbone provides a chevron design (very popular right now)
  • Custom Shapes – don’t be afraid to think outside the box and look for oval tiles or other shapes

HA Construction previously used a lot of tumbled stone in backsplash designs, but recently glass tiles have become popular. Again, don’t be afraid to get creative – the space over the stove usually lends for plenty of room for a fun pattern even if you plan to keep the rest of the backsplash neutral.


Maybe that’s why it’s called a “backsplash” – so you can add a splash of excitement to your kitchen décor. (Okay, we know that’s not the case, but we’ll go ahead and take the liberty to believe it to be true anyway.)

Tuesday, April 1, 2014

Kitchen Décor | Under Cabinet Lighting

There may be several ways you’re looking to add attractive design elements to your new kitchen so that it’s more than just the corner of the world where you prepare meals. One element you might consider is under the cabinet lighting.

Benefits of Under Cabinet Lighting
This stylish detail brings allows showcase accents in your kitchen that emphasize your personal design style, such as:
  • Bringing out the beauty in your granite countertops and tile back splash
  • Adding dimension to the more typical lighting options
  • Spotlighting decorative items displayed along the back of the counter (flowers, accessories, etc)

Under cabinet lighting is a great way to make a small kitchen seem larger too. Or, if your kitchen has limited window light, under cabinet lights can brighten up the place during meal prep and make the kitchen more inviting for countertop discussions and laughs.

And, something you might not even think about, under cabinet lighting provides a great nightlight so your teenage son can accommodate a midnight snack without turning on blinding lights. Of note, be sure to install the switch for your under cabinet lights in the same place as all of your other kitchen switches. If they’re switched individually or under the cabinet, you’ll forget they even exist. Putting the switch on the wall with the other lights is a convenient reminder of your awesome bonus feature.

Types of Under Cabinet Lights
There are several options when it comes to the types of lights you can install under your cabinets. Most require wiring, which HA Construction typically runs in with the display lighting for glass cabinet doors, hidden out of sight, of course. Some under cabinet lighting options include:
  • LED Tape Lights – Look to spend around $50 a linear foot, but you’re getting that green-friendly, long-lasting benefit of LED.
  • LED Puck Lights – This is a battery powered option, and an inexpensive one at that. At approximately $10 each, pucks are a great way to create a spotlight effect.
  • Flexible Strip Lights – You’ll get a few color options with this product: warm white, cool white, green, blue or red. Most are customizable and they run about $15 a strip.
  • Enhanced Incandescents – Available at around 60W, these typically come in two foot strips and run up to $50 each. Of note, they do get somewhat hot, so keep that in mind when planning what goes underneath them.

One of the kitchens in HA Construction’s portfolio had no less than 17 under the cabinet lights in its redesign and, as Andy himself said, “It looks like a million bucks.” So, if you’re looking for something to kick your kitchen design up a notch, under cabinet kitchen lighting may be just the thing. Contact HA Construction to start planning your layout!